> ## Documentation Index
> Fetch the complete documentation index at: https://docs.cripto.host/llms.txt
> Use this file to discover all available pages before exploring further.
# NodeOps
## **What is NodeOps?**
NodeOps Network is an AI-driven, chain-agnostic DePIN orchestration layer designed to provide verifiable decentralized computing services. Founded in 2023, it secured significant funding led by L1 Digital and Finality Capital.
The network uses a dynamic "burn-and-mint" model tied to protocol usage: users convert \$NODE into credits for computing services—burning the tokens—while providers earn revenue and the protocol mints new tokens based on economic activity.
The **\$NODE** token aligns incentives between users, providers, and protocol operations. Distribution allocates 47.5% to community/airdrop, 22.5% to early backers, 15% for incentives, and 15% for contributors, with emissions capped at 186,529 \$NODE daily.
## **User Guide (NodeOps)**
## Prerequisites
Before getting started, make sure you have:
### Compatible Wallet
* MetaMask (or another EVM-compatible wallet)
* Configured for the **Arbitrum One** network
👉 [https://metamask.io/](https://metamask.io/)
***
### \$NODE Tokens
You will need approximately:
* **2,605 \$NODE**
* 2,000 \$NODE for initial provider registration
* 600 \$NODE for bonding
* \~5 \$NODE for bridge fees (if applicable)
Estimated value: \~\$160–200 USD (market dependent)
***
### ARB ETH for Gas Fees
* \~0.01–0.03 ETH on Arbitrum
* Required to pay transaction fees
***
### Cripto Host Account
You must have an active account:
👉 [https://cripto.host/](https://cripto.host/)
***
> 💡 **Note:**\
> Cripto Host provides compatible infrastructure (≥6 vCPUs, ≥12GB RAM, ≥180GB SSD).\
> No hardware setup is required.\
> Always use official websites and never share private keys.
***
# Step-by-Step Inbound Process
Follow the steps below. Cripto Host handles the infrastructure automatically.
***
## 1. Configure Your Wallet on Arbitrum
### Objective
Prepare your wallet for \$NODE transactions.
***
### Install MetaMask
Download and install MetaMask:
👉 [https://metamask.io/](https://metamask.io/)
***
### Add the Arbitrum One Network
#### Easy Option (Recommended)
Use Chainlist:
👉 [https://chainlist.org/](https://chainlist.org/)
Search for **Arbitrum One** and add it automatically.
***
#### Manual Configuration
* Network Name: Arbitrum One
* RPC URL: [https://arb1.arbitrum.io/rpc](https://arb1.arbitrum.io/rpc)
* Chain ID: 42161
* Currency Symbol: ETH
* Block Explorer: [https://arbiscan.io/](https://arbiscan.io/)
***
### Add Gas Funds
Transfer \~0.01–0.03 ETH (Arbitrum network) to your wallet.
You can use:
* Bitget
* Kraken
* Arbitrum Bridge → [https://bridge.arbitrum.io/](https://bridge.arbitrum.io/)
***
## 2. Purchase and Transfer \$NODE to Arbitrum
### Objective
Acquire \$NODE tokens and move them to Arbitrum.
Do not purchase via the NodeOps portal (it is intended for bridging/staking).\
Use a centralized exchange for initial purchase.
***
### Example: Buying \$NODE on KuCoin
1. Create a free account at:\
👉 [https://www.kucoin.com/](https://www.kucoin.com/)
2. Deposit funds (USDT via card, bank transfer, or local methods)
3. Go to the Spot Market\
Search for **NODE/USDT**
4. Purchase approximately **2,605 \$NODE**
5. Withdraw tokens to your MetaMask:
* Select **Arbitrum** network
* Paste your wallet address
* Confirm withdrawal
Estimated time: 5–10 minutes
***
### If Bridging Is Required
If you purchased on Ethereum or BSC:
1. Go to:\
👉 [https://portal.nodeops.network/](https://portal.nodeops.network/)
2. Connect your wallet
3. Select **Bridge**
4. Choose:
* Token: \$NODE
* Amount: \~2,605
* Destination: Arbitrum
Confirm transaction (bridge fees may apply).
***
### Verify Balance
Check your balance on:
👉 [https://arbiscan.io/](https://arbiscan.io/)
If \$NODE does not appear in MetaMask, manually add the token contract from:
👉 [https://coinmarketcap.com/currencies/nodeops/](https://coinmarketcap.com/currencies/nodeops/)
Consider purchasing a few extra tokens to account for fee variations.
***
## 3. Connect to the NodeOps Dashboard
### Objective
Bond tokens and register as a provider.
***
### Access the Dashboard
👉 [https://cloud.nodeops.network/](https://cloud.nodeops.network/)
Click **“Connect Wallet”** and connect your wallet (Arbitrum network).
***
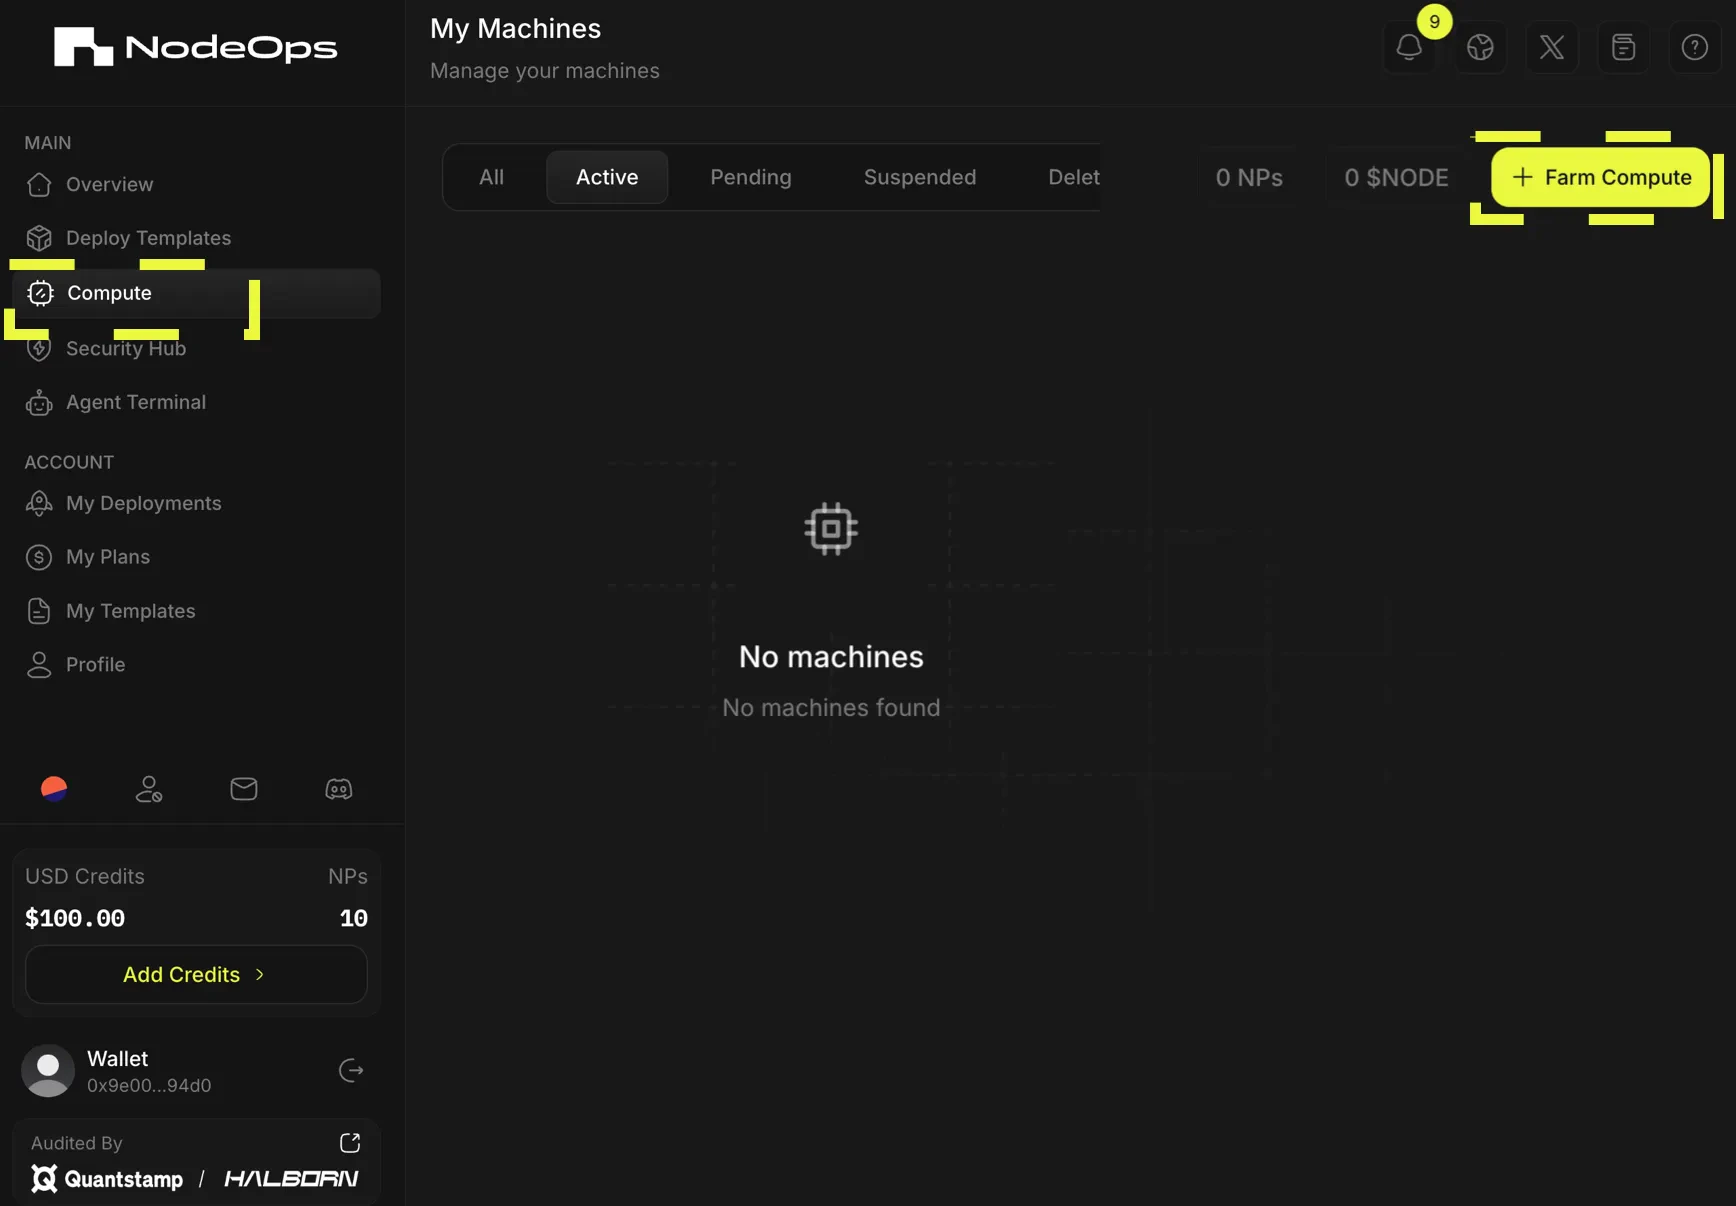
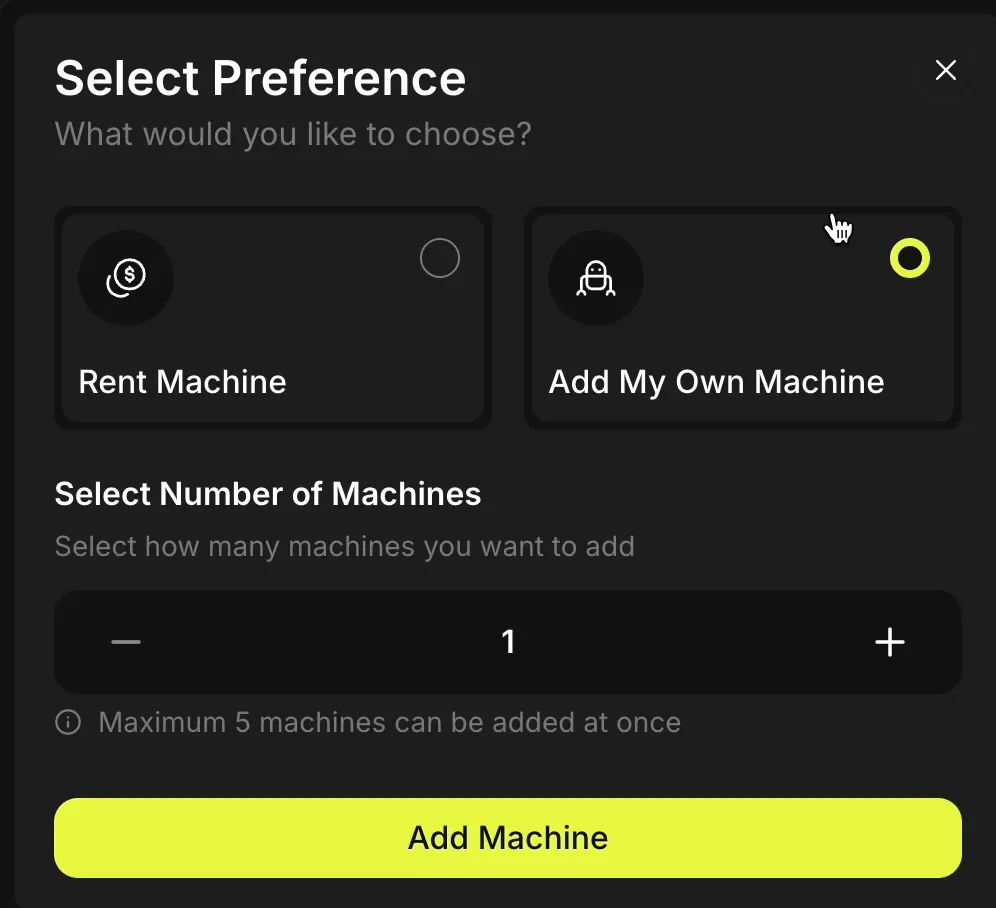
### Register as Provider
Navigate through:
`+ Farm Compute` → `Add My Own Machine` → `Become Provider`
 ***
### Bond 2,000 \$NODE (Initial Activation)
Bond **2,000 \$NODE** to activate your provider status.
This transaction officially registers you as a Compute Provider on NodeOps.
After confirmation, the dashboard will show:
**“2.0k \$NODE Bonded”**
***
### Bond 2,000 \$NODE (Initial Activation)
Bond **2,000 \$NODE** to activate your provider status.
This transaction officially registers you as a Compute Provider on NodeOps.
After confirmation, the dashboard will show:
**“2.0k \$NODE Bonded”**
 ***
### Copy the Setup Provider Code
Click **“Setup”**
Copy the generated **Setup Provider code**.
You will use this code inside Cripto Host.
***
## 4. Configure the Node in Cripto Host
### Objective
Provide the required information so Cripto Host can automate deployment.
### Access Node Settings
Inside your Cripto Host dashboard, open:
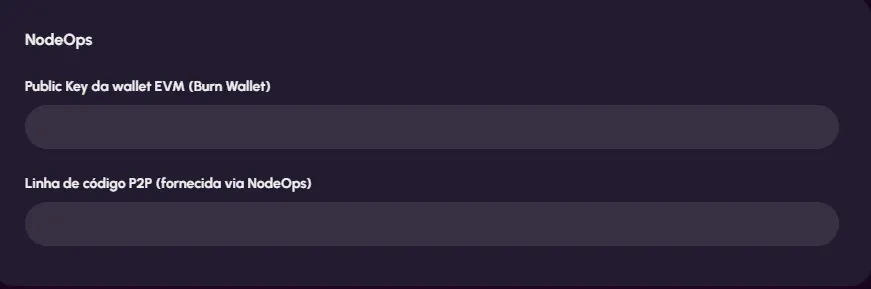
**NodeOps → Node Settings**
### Fill in the Required Fields
#### EVM Wallet Public Key (Burn Wallet)
Your wallet public address (example: `0x1234...abcd`)\
Copied from MetaMask.
#### P2P Setup Code
Paste the **Setup Provider code** generated in the NodeOps dashboard.
***
### Copy the Setup Provider Code
Click **“Setup”**
Copy the generated **Setup Provider code**.
You will use this code inside Cripto Host.
***
## 4. Configure the Node in Cripto Host
### Objective
Provide the required information so Cripto Host can automate deployment.
### Access Node Settings
Inside your Cripto Host dashboard, open:
**NodeOps → Node Settings**
### Fill in the Required Fields
#### EVM Wallet Public Key (Burn Wallet)
Your wallet public address (example: `0x1234...abcd`)\
Copied from MetaMask.
#### P2P Setup Code
Paste the **Setup Provider code** generated in the NodeOps dashboard.
 ***
## 5. Final \$NODE Bond on NodeOps Dashboard
Return to:
👉 [https://cloud.nodeops.network/](https://cloud.nodeops.network/)
With your wallet connected:
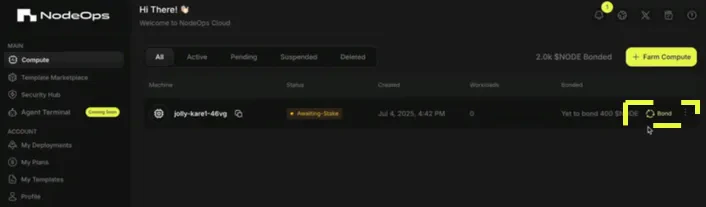
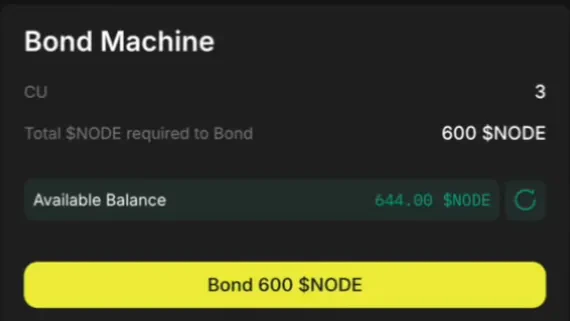
1. Click **“Bond”**
2. Add the remaining **600 \$NODE**
3. Confirm transaction in your wallet
***
## 5. Final \$NODE Bond on NodeOps Dashboard
Return to:
👉 [https://cloud.nodeops.network/](https://cloud.nodeops.network/)
With your wallet connected:
1. Click **“Bond”**
2. Add the remaining **600 \$NODE**
3. Confirm transaction in your wallet
 ***
### Activation Status
Your machine status will change:
`CONFIGURING` → `ACTIVE`
Once active, your node is fully operational.
***
### Activation Status
Your machine status will change:
`CONFIGURING` → `ACTIVE`
Once active, your node is fully operational.
 ***
# What Happens Next?
* ✅ Cripto Host monitors your node 24/7
* ✅ ≥99% uptime with SLA compliance
* ✅ Dashboard displays accumulated rewards
* ✅ Alerts if attention is required (e.g., downtime)
***
# Useful Links
* NodeOps Documentation — [https://docs.nodeops.network/](https://docs.nodeops.network/)
* NodeOps Dashboard — [https://cloud.nodeops.network/](https://cloud.nodeops.network/)
* MetaMask — [https://metamask.io/](https://metamask.io/)
* \$NODE (CoinMarketCap) — [https://coinmarketcap.com/currencies/nodeops/](https://coinmarketcap.com/currencies/nodeops/)
***
# What Happens Next?
* ✅ Cripto Host monitors your node 24/7
* ✅ ≥99% uptime with SLA compliance
* ✅ Dashboard displays accumulated rewards
* ✅ Alerts if attention is required (e.g., downtime)
***
# Useful Links
* NodeOps Documentation — [https://docs.nodeops.network/](https://docs.nodeops.network/)
* NodeOps Dashboard — [https://cloud.nodeops.network/](https://cloud.nodeops.network/)
* MetaMask — [https://metamask.io/](https://metamask.io/)
* \$NODE (CoinMarketCap) — [https://coinmarketcap.com/currencies/nodeops/](https://coinmarketcap.com/currencies/nodeops/)